|
|
Post by brucew268 on Mar 12, 2023 12:33:36 GMT
Second try – wood framesGIK Acoustics make some of the lightest commercially made panels at 3.6kg for a 50mm panel and 5.6kg for a 118mm panel. Their prices are hugely reasonable and their products better quality and more effective than the foam stuff you can get elsewhere, so if this sort of DIY is not your thing, GIK is a great way to go. My own costs were about 50% of what I would have paid them for the same, but the economies probably only work if making four or more panels, as Rockwool RWA45 comes in packs of nine slabs and Camira Cara fabric is a minimal order of 5m (x1.7m). That’s three panels if you use Camira on the front and back or 6 panels if using a different fabric on the back. GIK use a plywood back frame 18mmx18mm and then nail hardboard to the side of it to protect and stiffen the rockwool sides. But nailing or otherwise fastening hardboard to something else requires the right fasteners and power tools to penetrate the hardboard and hold securely without blowing clean through it. I didn’t feel like going that route. For the wooden frames I’ve used 9mm plywood (hardwood thoughout), fastened the ends with wood glue and held by nail brads while the glue dried. Then I added steel angle brackets on the outside corner to provide the real strength for the corner joint.  panels slats 3 sets panels slats 3 sets by Bruce Warren, on Flickr 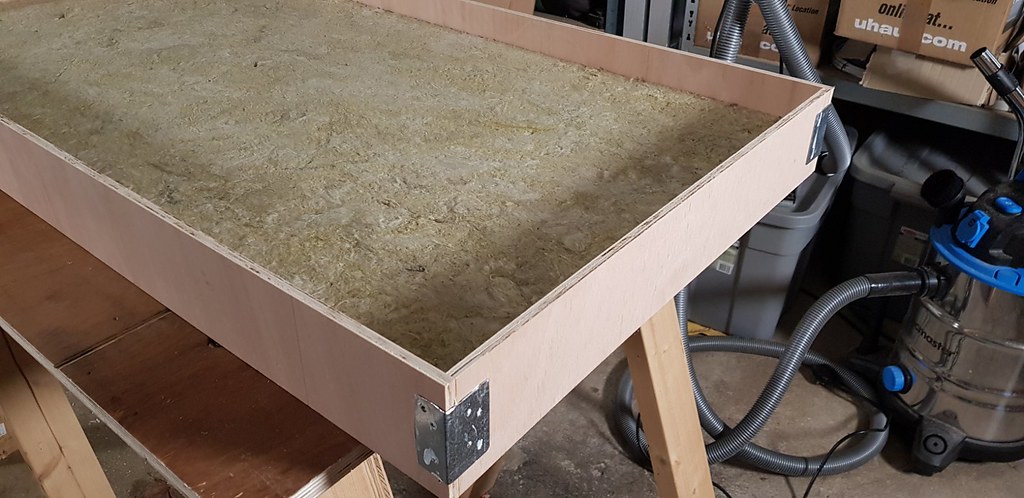 panels bare frame panels bare frame by Bruce Warren, on Flickr GIK use Camira Cara fabric, which is a fine hessian weave that is acoustically transparent and made of Olefin threads, related to the material used in heatshrink tubing I guess. GIK will also sell the fabric direct and one can find another seller on Ebay of the Camira Cara and that is even cheaper. One advantage of Camira Cara over others is that it comes in 1.7m tall rolls and sold in multiple meter lengths which is a lot more fabric per linear meter than other brands I’ve seen. So, you are paying less per square meter than it might seem at a glance. As you’ll know, hessian is a looser weave than other fabrics and has a tendency to unravel along the cut edge with long strands. Very annoying. Pinking shears help but only so much. But since this stuff is Olefin, you can just use a heat gun on low setting (or a butane lighter) to melt the edges just enough to keep from unravelling without getting hard, puckery, or nubby. I found it worked a treat.  panels pinked fabric panels pinked fabric by Bruce Warren, on Flickr  panels heat gun panels heat gun by Bruce Warren, on Flickr For a 1200x600x50mm broadband panel, I cut a 1370x770 front sheet and the same size back sheet, then wrapped the back sheet around the frame first, stapled the folded edge onto the front panel edge, then did the mirror image of the process with the front sheet. This produced an overlapping clamshell design, neatly finished and secure. Since the edges and corners of the back sheet will be covered by once the front sheet is attached, less attention and fabric is needed on the back sheet corners. 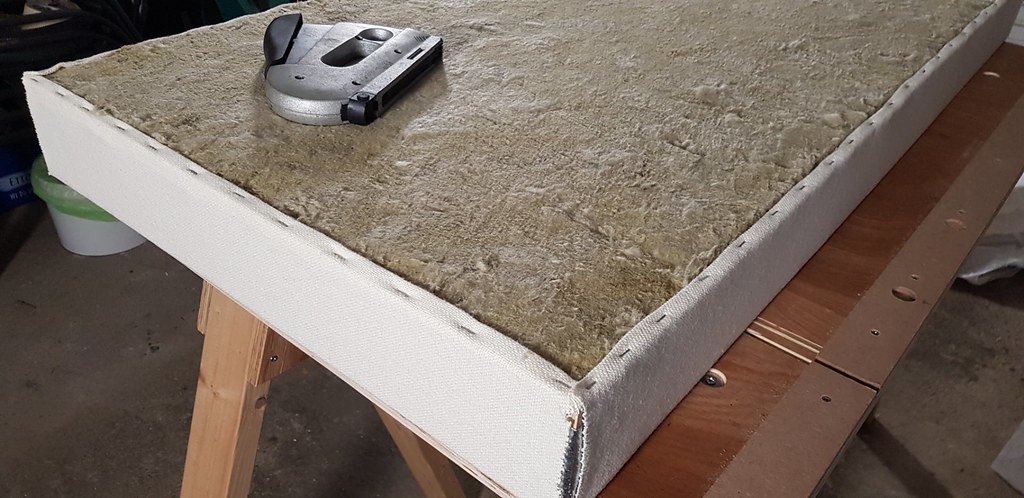 panels back fabric stapled panels back fabric stapled by Bruce Warren, on Flickr  panels front fabric corner pattern panels front fabric corner pattern by Bruce Warren, on Flickr  panels corner treatment panels corner treatment by Bruce Warren, on Flickr  panels finished corner panels finished corner by Bruce Warren, on Flickr The finished result was 3.2kg for the 50mm panels and 5.7kg for the 100mm panels, as light or better than the GIK panels, though neither is meant to be thrown around or sat on! Of course bass trap panels work best with an air gap behind them, so I use them straddling a corner or parallel to one wall and against the other wall 4-6” out from the corner. In my small room I prefer the latter as the corner straddling orientations produced some hollow sounding voices. In my larger listening room, that did not happen so I straddled the corners.  panels finished front panels finished front by Bruce Warren, on Flickr Because my office has 2 large bookcases, 3 large cabinets, and a table-desk, there are lots of large reflective surfaces protruding into the room at various places along the wall. I started with a pair of panels at the first side reflection points and a couple narrow panels placed at strategic spots to tame other reflections. That seemed to work well on quieter music or less busy, complex music but quickly got congested and pressurised at volume with busy, complex music.
|
|
|
|
Post by karma67 on Mar 12, 2023 13:24:19 GMT
they look great bruce,did you check out the same insulation GIK use? Knauf Insulation Earthwool i believe it is.
|
|
|
|
Post by macca on Mar 12, 2023 13:34:58 GMT
what are the room dimensions Bruce?
have you tried diffusion on the wall behind you and absorption in the corners behind you? Or absorption behind you and in the corners?
|
|
Arke
Moderator
Posts: 1,020
|
Post by Arke on Mar 12, 2023 15:01:23 GMT
Great posts Bruce! Really good info and very useful details.
I will need to do this in my new music room, so great to follow your findings. I'll have lots of reflective surfaces so will need quite a few absorbers and diffusers. I may disguise some panesl with prints (on appropriate material)
|
|
|
|
Post by Pigmy Pony on Mar 12, 2023 15:31:08 GMT
|
|
|
|
Post by brucew268 on Mar 12, 2023 18:48:52 GMT
they look great bruce,did you check out the same insulation GIK use? Knauf Insulation Earthwool i believe it is. One full size and two narrow panels from 2016 are Knauf which I bought from GIK and still using them to good effect. The new ones are all Rockwool RWA45 which I quite like, perhaps better than Knauf. what are the room dimensions Bruce? have you tried diffusion on the wall behind you and absorption in the corners behind you? Or absorption behind you and in the corners? The room is 11'x12.4'. I've tried absorption on the wall behind me to the sides of my shoulders thinking it would help further but decided it was better without.
Current best practice is meant to be absorption in the centre behind the listener and perhaps diffusion halfway to the corners, but I have my desk and computer screen directly behind me and a picture above that so haven't tried it yet. The wall behind is too close to me for diffusion to be recommended and when I tried early on it was horrid, if for no other reason than I needed a lot more absorption before considering adding any diffusion. I did try a bass trap in one corner but so far am preferring the bass traps behind the speakers instead.
|
|
|
|
Post by brucew268 on Mar 12, 2023 18:59:04 GMT
Some good art/picture ideas here and low cost... of course they're not likely to be acoustically transparent but may work well if using primarily on bass traps. Of course if a bass trap doesn't have a front membrane it is also a broadband absorber so will change the HF reflections in the room depending on the fabric used. GIK offer panels with art printed on Camara Cara, but one starts to get into real money at that point. OTOH, the PAF goes way up when using in a main lounge giving one more latitude in placements so may be worth the investment. |
|
|
|
Post by brucew268 on Mar 12, 2023 19:08:58 GMT
For the wooden frames I’ve used 9mm plywood (hardwood thoughout), fastened the ends with wood glue and held by nail brads while the glue dried. Then I added steel angle brackets on the outside corner to provide the real strength for the corner joint. panels bare frame by Bruce Warren, on Flickr BTW: the panels I made in 2016 used precut timber of the width I needed but found they tended to twist and warp either in the garage or once I built them up and brought inside. So went with hardwood plywood this time for more stability. Of course having a saw with a straight guide is a huge bonus for this sort of thing.
If ultra light weight is not the priority, 12mm plywood would be easier to handle than 9mm when assembling the corners. You can get 40x40x40mm angle brackets from Wickes, but I just bought some light construction joists for 1/4 the cost and 1/2 the weight and cut them to size and filed off the rough edges. The 40x40x40 brackets @£1 each are a lot simpler to use and then fasten them to the corners with some cheap "grab adhesive".
|
|
Bigman80
Grandmaster
 AA Founding Member & Bigbottle Audio Creator
Posts: 16,142
|
Post by Bigman80 on Mar 12, 2023 22:20:21 GMT
Great posts Bruce! Really good info and very useful details. I will need to do this in my new music room, so great to follow your findings. I'll have lots of reflective surfaces so will need quite a few absorbers and diffusers. I may disguise some panesl with prints (on appropriate material) Tell me more about prints....as in, where would you get them? |
|
Arke
Moderator
Posts: 1,020
|
Post by Arke on Mar 12, 2023 22:32:45 GMT
Great posts Bruce! Really good info and very useful details. I will need to do this in my new music room, so great to follow your findings. I'll have lots of reflective surfaces so will need quite a few absorbers and diffusers. I may disguise some panesl with prints (on appropriate material) Tell me more about prints....as in, where would you get them? Lots of places do them online (search: 'acoustic canvas art'), including GIK. You can upload you own images or choose from their libraries. I need to research more as would ideally like to find a place that does (empty) deep canvases on acoustic canvas so I can rockwool myself. |
|
|
|
Post by brucew268 on Mar 22, 2023 18:39:22 GMT
I was surprised by the result when modifying my DAC’s external power supply this week. I’d been experiencing some issues with static electricity in the system and decided that perhaps the DC neg output of my DAC’s external power supply should not be floating but should be earthed to the chassis.
So I changed the DC socket to one with chassis ground and plumbed it back in. I hoped it would solve the static problem and also perhaps even sound better.
Wrong! The static problem was still there AND the system had made a significant step back in transparency. I first thought it must be something else, time of day, mood, plugged ears, something. But after a couple more listens over a couple days, it was definitely and significantly worse.
So I put things back to a floating power supply output and everything in the music returned.
After reading up a little, I’m none the wiser on why that was the result unless it has something to do with the specific topology of this PSU, but I think maybe I’ll leave it with this setup.
|
|
|
|
Post by brucew268 on Mar 29, 2023 21:30:48 GMT
First play of Euphony Stylus on a NUC this evening (USB Trial license). The sound floor is definitely higher, less transparent, less lifelike shape of instruments and the space in between. Timing is definitely not as good or natural.
Good thing I’ve been listening primarily to CD’s this past year for a baseline to compare to (audiolab 6000CDT).
I’m going to have to play with settings a good bit to see if I can get closer to real music, might have to pay a month’s subscription for access to settings. I already have what should be a decent linear PSU on it.
Disappointed.
|
|
Bigman80
Grandmaster
AA Founding Member & Bigbottle Audio Creator
Posts: 16,142
|
Post by Bigman80 on Mar 29, 2023 23:06:47 GMT
First play of Euphony Stylus on a NUC this evening (USB Trial license). The sound floor is definitely higher, less transparent, less lifelike shape of instruments and the space in between. Timing is definitely not as good or natural. Good thing I’ve been listening primarily to CD’s this past year for a baseline to compare to (audiolab 6000CDT). I’m going to have to play with settings a good bit to see if I can get closer to real music, might have to pay a month’s subscription for access to settings. I already have what should be a decent linear PSU on it. Disappointed. Those Audiolab cdp are bloody brilliant IMO. Regardless of cost. If I were to be a cd fan, I'd have one here. Shame the nuc is not up to the task so far, but I'm not shocked at your report. My impression of them isnt great either. |
|
|
|
Post by brucew268 on Mar 30, 2023 8:20:53 GMT
First play of Euphony Stylus on a NUC this evening (USB Trial license). The sound floor is definitely higher, less transparent, less lifelike shape of instruments and the space in between. Timing is definitely not as good or natural. Good thing I’ve been listening primarily to CD’s this past year for a baseline to compare to (audiolab 6000CDT). I’m going to have to play with settings a good bit to see if I can get closer to real music, might have to pay a month’s subscription for access to settings. I already have what should be a decent linear PSU on it. Disappointed. Those Audiolab cdp are bloody brilliant IMO. Regardless of cost. If I were to be a cd fan, I'd have one here. Shame the nuc is not up to the task so far, but I'm not shocked at your report. My impression of them isnt great either. I was thinking Tony had said one of the high end streamers he likes rather well is at its core a customised and well fettled NUC. So I should potentially be able to get to something impressive... maybe. |
|
|
|
Post by brucew268 on Apr 9, 2023 18:53:20 GMT
First play of Euphony Stylus on a NUC this evening (USB Trial license). The sound floor is definitely higher, less transparent, less lifelike shape of instruments and the space in between. Timing is definitely not as good or natural. Good thing I’ve been listening primarily to CD’s this past year for a baseline to compare to (audiolab 6000CDT). I’m going to have to play with settings a good bit to see if I can get closer to real music, might have to pay a month’s subscription for access to settings. I already have what should be a decent linear PSU on it. Disappointed. I've been making progress on the NUC with Euphony OS/player, installed it to the OS drive, made several setup changes* based on user recommendations, put cleaner power on the router/switch -- most of which made incremental improvements. I was feeling fairly good about the progress on all of the above measures though with a nagging sense of not there yet.
...Then I switched over to the CD transport for a reality check. ...yeah. Not there yet. I suppose if someone hadn't been listening to CD's as their reference, they might convince themselves this was great. But good is not there yet.
I imagine putting a Mutec between the server and DAC might improve the timing, but not sure it would handle the other SQ needs above, including the micro details and small transients. So, a little more setup experimentation is required, but can't try too much more without different server hardware and then I've got more than pocket change invested in an approach I'm not sure will end where I want. Emm.
*set max CPU frequency lower
play from memory buffer boot system into Ramroot
|
|
|
|
Post by brucew268 on Apr 17, 2023 17:09:48 GMT
I did make better progress when booting to RAMroot, limiting the CPU frequencies 10 1.2 GHz, and playing with Linux’s CPU Governor. But it still needs a bit more so will try a Mutec MC-3+ USB.
|
|
|
|
Post by brucew268 on Apr 17, 2023 17:17:45 GMT
When the conversation is about transparency or especially about resolution, I think that there can be a frequency element to that so that our perception of increased transparency and the extra detail, even low level detail, sometimes consists of certain high frequencies being highlighted. My experience this weekend felt a bit different, opposite even. Project: I’ve been wanting for some time to rebuild my distribution box so finally did that this weekend. My existing mains hydra was already hardwired from the wall through to the plugs going into the back of each component,
 20230414_145857 20230414_145857 by Bruce Warren, on Flickr [New Wago 221-615]
So, I’d been thinking about a 6-way distribution box based on WAGO 221-615, so 2 5-way connectors joined by a jumper to provide all that was needed. To get them up off the metal earthing plate I used some 10mm thick Perspex left over from another project, since I didn’t fancy using wood spacers (flammable), and connected them using superglue. For circuit safety I decided to use a spare circuit breaker.  20230415_133452 20230415_133452 by Bruce Warren, on Flickr  20230415_133519 20230415_133519 by Bruce Warren, on Flickr BTW: Though Youtube videos say one can use a jig saw on Perspex or a circular saw with 60 teeth or more, I found the tendency to melt the Perspex rather fiddly. After trying a few times I ended up doing best with just a basic hacksaw. I made spacer blocks 35mm x 20mm to fit the foot print of each Wago connector and superglued to each Wago. This layout seemed pleasingly organised so had a go. Feels pretty tidy overall. With 6 cables each having 3 insulated cores, that can be a bit of a tangle inside so needed bootlace ferrules crimped on for tidy and safe connections. Sound results:My main concern was that it wouldn’t sound worse than my existing setup but when I turned the mains back on was pretty surprised and pleased that it sounded significantly better, like I got a significant step up in transparency. Was everything perfect? No but I decided to refrain from making an immediate judgement… which gave me time to realise how much better the rest of the presentation was. The sound had a greater sense of pitch to the bass notes of instruments. More texture and inflections came though across the frequency spectrum. Sounds whether normal or fine detail were just suspended in space to more easily appreciate each one while still retaining a sense of the mix as an organic whole. Dynamics are rather good but punch is slightly less. Overall, this really does feel like a higher tier of sound reproduction than I’ve heard from this system in some time. Yet the HF is not spotlit. In fact it feels like the 4-6 KHz range may be a bit lower than before so that I have turn the music up a little more to get that bite out plucked strings, percussion, and some female voices that I’d become accustomed to. Wonderings:The main change was from distribution blocks that claimed to be copper screw cages, but I suspect had a fair bit of brass in them, to Wago 221 connectors which are all copper and a good bit lower mass. So, I wonder if this is related to Oli’s preference for getting brass out of his system as much as possible in favour of copper. Did the brass give sound a bit more bite? Seems so. Was that natural or not? Not sure yet. Could that ‘bite’ have acted a bit as glare to veil transparent detail cross the frequency spectrum? Maybe.  20230417_174332 20230417_174332 by Bruce Warren, on Flickr [Previous distribution blocks] The one physical downside is that with this hydra arrangement coming out of the lid, it is a little fiddly to make changes. One has to loosen the glands all the way and then slide the lid all the way to the other end of all the cables in order to work without things getting in the way too much. The two stiffer cables add logistical issues as well. It might work better to use a taller box, closer to 100mm than the current 60mm, where the 2 rows of cables, could enter from one side rather than the top. I do know just the one. Ah well I’m enjoying the music and re-exploring some of my catalog.  20230414_165338 20230414_165338 by Bruce Warren, on Flickr [/div] |
|
|
|
Post by firebottle on Apr 17, 2023 17:36:01 GMT
Dynamics are rather good but punch is slightly less. Overall, this really does feel like a higher tier of sound reproduction than I’ve heard from this system in some time.
Great post Bruce. I think the less punch is due to the bottom end being cleaner, or less muddled, however small the difference.
I have had the same effect when 'improving' things. |
|
|
|
Post by brucew268 on Apr 27, 2023 17:09:56 GMT
Here’s an irony – after I agreed to sell the Magnepan .7’s, I set them up for the first time since I moved the HiFi to the office… and found that they sound much better than they did in the lounge, better here in fact than the Proac’s.
They have that amazing open quality that shines on acoustic music, so that upright bass sounds more real, more right sized, better pitch definition, more like a full size upright bass does. Cymbals and brushwork on drums and snare have better leading edge transients and realism. With piano, you feel more of the size of the sound board and its acoustics. It's hard to describe the sound, but people says it's a quality of a boxless design and the speed of the mylar panel... not that box speakers can't get there.
I thought my modified Proac’s did all that pretty well, but after 5 days with the Maggies and then switching back as they went out the door with the buyer I’m saying, "Did I really just sell those?" But I do think I like the centre vocals a little better with the boxes.
|
|
Bigman80
Grandmaster
AA Founding Member & Bigbottle Audio Creator
Posts: 16,142
|
Post by Bigman80 on Apr 27, 2023 19:06:42 GMT
Isn't that always the way?
As soon as you agree to flog something it starts to sound incredible lol
|
|
|
|
Post by brucew268 on May 14, 2023 15:37:46 GMT
I was surprised by the result when modifying my DAC’s external power supply this week. I’d been experiencing some issues with static electricity in the system and decided that perhaps the DC neg output of my DAC’s external power supply should not be floating but should be earthed to the chassis. So I changed the DC socket to one with chassis ground and plumbed it back in. I hoped it would solve the static problem and also perhaps even sound better. Wrong! The static problem was still there AND the system had made a significant step back in transparency. I first thought it must be something else, time of day, mood, plugged ears, something. But after a couple more listens over a couple days, it was definitely and significantly worse. So I put things back to a floating power supply output and everything in the music returned. After reading up a little, I’m none the wiser on why that was the result unless it has something to do with the specific topology of this PSU, but I think maybe I’ll leave it with this setup. The "static electricity" issues turned out to be a byproduct of a failing PSU. When I put a new build of the same PSU board in place, the static electricity issues seem to have disappeared.
I also decided to have another go with the chassis-grounded DC socket in the DAC’s external PSU to see if my initial SQ impressions had been skewed. Yes, the lower end weight seemed more musically engaging than the floating PSU had been but was a bit bloated and in your face, eclipsing the HF into the background.
As a reality check, I then compared to an iFi iPower and also to a battery PSU. The iPower was similar in having greater weight to the lower mids, though it couldn’t handle the separation or complex music nearly so well. It seems that the floating linear PSU excels in the high frequencies and transients but does not have the weight or body in the lower mids and upper bass as the grounded socket and the iPower each let through.
Since I set up the speakers and acoustic panels with the floating PSU in place, the room’s bass reinforcement nodes were working with its outputted frequency curve. Now that room’s bass reinforcement was working against the other PSU’s and they seem overbalanced into the lower ranges and a bit bloated.
I spent about an hour working with the speaker placement yielding a better, more balanced result with the grounded socket, better upper bass>lower mids and better HF and transients. Just another reminder that one builds a system around existing components and for the parameters of the room, so compensations are natural. When one changes to a component with a significantly different sonic signature, other things may need to change to compensate back towards an overall balanced sound, hopefully maintaining the improvements sought with the new component.
|
|
optical
Moderator
BIG STAR
Be Excellent To Eachother
Posts: 1,576 
|
Post by optical on May 14, 2023 15:41:34 GMT
When one changes to a component with a significantly different sonic signature, other things may need to change to compensate back towards an overall balanced sound, hopefully maintaining the improvements sought with the new component. I literally could not agree more with that final statement Bruce. Very well summarised. |
|
|
|
Post by misterc on May 14, 2023 15:56:56 GMT
In Mr.C's circles we call it fooking around for 1's & 2's if you ever get to that point, then you have reach the end stop on that particular product, room boundaries adequate cabling, bad mains, crap day, or ears need celeaning.
Have been there many, many times, the magic bullet here is KNOWING when to say ok thats it for today instead of plodding on regardless. It gets us all in the end lol
|
|
|
|
Post by brucew268 on May 29, 2023 9:48:42 GMT
It seems that even when isolation is used between speakers and stands, the sound is still rather influenced by the interface at the bottom of a stand. At the top I have IsoAcoustics Mini Pucks and roller bearings and needed a plinth at the bottom to raise the speakers to the right height for my listening position. 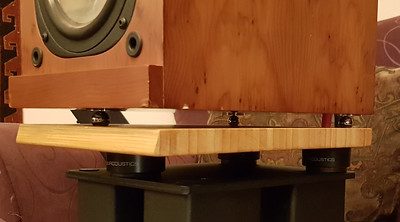 Isolation speaker Isolation speaker by Bruce Warren, on Flickr At first I made a plinth that sat directly on the floor and had the stand raised a couple inches above it, but since the floor is a little uneven on one side of the room I was concerned that the bass was affected by some instability.  Plinth floor_crop Plinth floor_crop by Bruce Warren, on Flickr So, I made a thick oak plinth with its own levelling feet and bolted it directly to the bottom of the stand. I wasn’t expecting a change in sound but I guess I should have. The plinth served to damp the stand’s bottom plate and gave me some unnatural dips or bumps in the frequency curve. I added rubber washers in between, then tried steel washers, then stacked rubber and steel. Each changed the curve but not back to a balanced one. Removing the bolts and using static ball bearings between the steel plate and oak plinth was close but not quite there. I tried a standard spike/cup arrangement which sounded… spikey. All configurations altered the resonance of the bottom plate so that certain frequencies were emphasised or attenuated, resulting in an imbalanced and unnatural frequency curve – even with full isolation already in use at the top of the stand. In the end, I rested the ball bearings on steel washers over the plinth holes and put the plate on top of that. This resulted in the most natural frequency balance and best sound and looks like I may stick with that.  plinth leveled plinth leveled by Bruce Warren, on Flickr |
|
optical
Moderator
BIG STAR
Be Excellent To Eachother
Posts: 1,576
|
Post by optical on May 29, 2023 10:10:29 GMT
It seems that even when isolation is used between speakers and stands, the sound is still rather influenced by the interface at the bottom of a stand. At the top I have IsoAcoustics Mini Pucks and roller bearings and needed a plinth at the bottom to raise the speakers to the right height for my listening position. Isolation speaker by Bruce Warren, on Flickr At first I made a plinth that sat directly on the floor and had the stand raised a couple inches above it, but since the floor is a little uneven on one side of the room I was concerned that the bass was affected by some instability. Plinth floor_crop by Bruce Warren, on Flickr So, I made a thick oak plinth with its own levelling feet and bolted it directly to the bottom of the stand. I wasn’t expecting a change in sound but I guess I should have. The plinth served to damp the stand’s bottom plate and gave me some unnatural dips or bumps in the frequency curve. I added rubber washers in between, then tried steel washers, then stacked rubber and steel. Each changed the curve but not back to a balanced one. Removing the bolts and using static ball bearings between the steel plate and oak plinth was close but not quite there. I tried a standard spike/cup arrangement which sounded… spikey. All configurations altered the resonance of the bottom plate so that certain frequencies were emphasised or attenuated, resulting in an imbalanced and unnatural frequency curve – even with full isolation already in use at the top of the stand. In the end, I rested the ball bearings on steel washers over the plinth holes and put the plate on top of that. This resulted in the most natural frequency balance and best sound and looks like I may stick with that. plinth leveled by Bruce Warren, on Flickr Very admirable endeavour Bruce, I haven't delved this deep into speaker isolation as yourself (mostly because I've always had floor standers so it's just spikes or pucks really). However, I have had similar results when 'mixing' types of isolation and to be honest in hardly ever ends in a satisfactory result. I usually ended up removing nearly all the extra isolation methods and going back to straight de-coupling from the floor, usually just using rubber feet. As my speakers have all been fairly heavy they are stable enough. I think using stands, things become a lot more complicated..... ie isolation of stand from floor and speaker, interaction between speaker and stand etc.... When I did run stand mounts I actually had most success coupling the speakers to some heavy stands just using a crude blu-tac method, then having the heavy stands sit on rubber feet on wooden floor or spiked through to screed on a carpeted floor.... Hope you find something that works anyway. |
|
|
|
Post by brucew268 on May 29, 2023 10:59:00 GMT
Very admirable endeavour Bruce, I haven't delved this deep into speaker isolation as yourself (mostly because I've always had floor standers so it's just spikes or pucks really). However, I have had similar results when 'mixing' types of isolation and to be honest in hardly ever ends in a satisfactory result. I usually ended up removing nearly all the extra isolation methods and going back to straight de-coupling from the floor, usually just using rubber feet. As my speakers have all been fairly heavy they are stable enough. I think using stands, things become a lot more complicated..... ie isolation of stand from floor and speaker, interaction between speaker and stand etc.... When I did run stand mounts I actually had most success coupling the speakers to some heavy stands just using a crude blu-tac method, then having the heavy stands sit on rubber feet on wooden floor or spiked through to screed on a carpeted floor.... Hope you find something that works anyway. Hopefully the current setup will prove out over time. ...but I do think I'll build some floorstanders next spring. |
|
|
|
Post by antonio on May 29, 2023 13:53:45 GMT
brucew268 I can see you have done plenty of experiments and know more than me regarding speaker/stand isolation, but I am always uncomfortable with not piercing the carpet with spikes. More work and expense I know, but have you thought of having a board with spikes underneath to sit under your stands as they are now? optical You will not couple speakers to stands using blu tac Chris , this will de-couple . I believe I have mentioned before, hard and pointy = couple, soft and squishy = de-couple. There is an easy way to remember this, I'll just leave it to your imagination. 
|
|
optical
Moderator
BIG STAR
Be Excellent To Eachother
Posts: 1,576
|
Post by optical on May 29, 2023 14:20:50 GMT
brucew268 I can see you have done plenty of experiments and know more than me regarding speaker/stand isolation, but I am always uncomfortable with not piercing the carpet with spikes. More work and expense I know, but have you thought of having a board with spikes underneath to sit under your stands as they are now? optical You will not couple speakers to stands using blu tac Chris , this will de-couple . I believe I have mentioned before, hard and pointy = couple, soft and squishy = de-couple. There is an easy way to remember this, I'll just leave it to your imagination. Dave, nice to hear from you. Just to explain about my blu-tac method, it was actually just spreading a very thin layer on a flat surface and 'mating' the speaker to the surface of the heavy stands. The blu-tac acted more as an adhesive to stop the speaker slipping off than anything as the majority of the speaker and stand surfaces were now in contact. That probably wasn't very clear and sounded more like I just put a ball of tac in each corner and plonked it on the stand, not quite the case. Anyway I'm not sure if this constitutes coupling or de-coupling, (perhaps a bit of both) but it certainly did the job for me and effectively coupled the base of the speaker to the mass of the stand. Certainly added something I liked to the sound. |
|
|
|
Post by brucew268 on May 29, 2023 16:09:18 GMT
brucew268 I can see you have done plenty of experiments and know more than me regarding speaker/stand isolation, but I am always uncomfortable with not piercing the carpet with spikes. More work and expense I know, but have you thought of having a board with spikes underneath to sit under your stands as they are now? I could do an actual board with spikes but will wait on that a while. I looked for cups with spikes but seems only IsoAcoustics is offering them right now, a bit overpriced and over long (for thick carpet, which mine is not). But I am thinking to source some furniture castor cups with hard plastic spikes to see what that does.
That being said, the HF and LF sound enough better with the leveling feet that I'll will spend a few says getting familiar with the sound. |
|
|
|
Post by brucew268 on May 30, 2023 6:58:49 GMT
antonio I forgot that I have threaded spikes that will fit the existing plinth! So, I could replace the leveling feet with threaded spikes, but still thinking to wait a while and listen to some music.
|
|


